A background can be replaced or removed in various ways. We’ve previously described it on one of our articles – Change Photo background to White using Photoshop.
In that article, we had described how to remove background using Photoshop and we had focused on the Pen tool for doing it.
But, there is another alternative way of doing the same thing using another technique known as masking.
Masking is very much effective for removing or changing the background of an image where the subject has hair or fur or other frizzy edges. It doesn’t harm the edges it refines them.
In this article, we’ll show you the hair masking technique which you can use to replace or remove any background because it is a very easy way to mask hair in Photoshop.
But first, let’s cover up the basic.
What is masking in Photoshop?
Mask in Photoshop does the same work as the real-life masks. It simply hides or reveals the image transparency. Using a mask over the image you can reveal or hide the portions of the image you want to.
There are two colors that you need to understand while masking one is black and the other is white. The job of white color is to reveal the portion and the job of black color is to hide the area. Masking is done using these two colors.
There different types of masking like layer masking, clipping mask, channel masking, color masking, etc. In this article, we’ll show the Photoshop select and mask tutorial for hair.
Therefore without further adieu, let’s start!
How to mask hair in Photoshop cs5?
Photoshop is the best tool for editing photos no matter what kind of editing you want to do. If you want to do Image masking here we brought the easy way to mask hair in Photoshop.
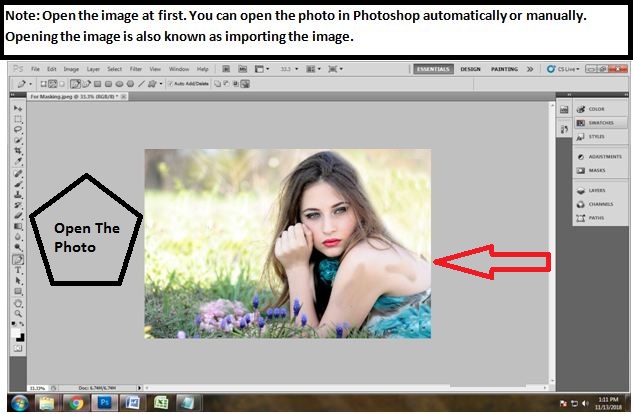
Open the Image
Whenever you work in Photoshop, the thing you have to do at first is to open the image in Photoshop. It is obvious, isn’t it? So you have to open the Photo to mask image in Photoshop. To open the photo go to, File>Open. You will get a windows box from where you will get to search your required photo and open it. Select the required image from windows and click on open. Your photo will be opened in Photoshop.
You can also import the image by dragging the photo from a folder of windows or desktop. This is the easiest and time-saving way of importing the photo in Photoshop.
Drawing Clipping Path
Do you all know what clipping path is? It is the biggest tool for removing the background. Clipping path technique is very much important to apply for mask image in Photoshop too. On the background layer taking the path layer, we are going to draw the clipping path. We have selected the pen tool for drawing clipping path. The pen tool is considered as the most effective tool for clipping path.
After selecting the pen tool, draw the clipping path over the subject we have. Remember, you should not leave a single part. We have created clipping path all over the girl with hair. In the case of masking, hair is the most important part. So take the hair part fluently.
![]()
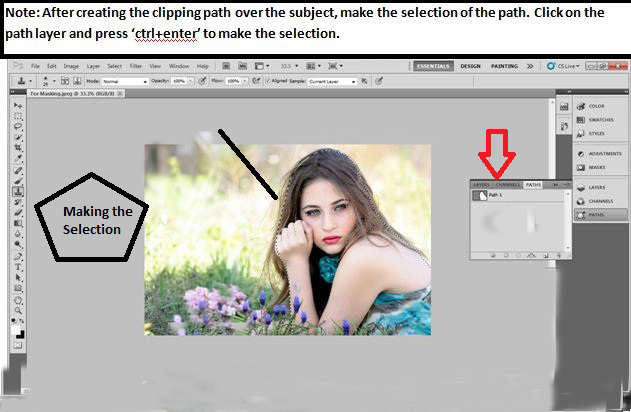
Making the Selection
After drawing the clipping path, we have to make the selection of the path area we have created. Do the selection right after you are done with making clipping path around the girl’s image. Click on ‘path 1’ and press ‘ctrl+enter’ on a keyboard to select the path. Doing that, the entire area you have worked on will be selected. You will see moving dots around your subject which indicates that the selection has been made.
Taking Feather
The work would have ended if it was the work of just removing the background. Since we are showing How to mask hair in Photoshop? We have more things to do.
Now when the path of the subject has created and selected, we are taking feather over the photo to work further on hair masking. To take the feather, press Shift+f6 to create the feather. Feather is created so that we can take the entire hair. After getting the feather box, you will have to set the radius. Set the radius on 0.5 and press enter.
![]()
Copy the Background
When you are done setting up the amount of feather, copy the background of the main background. To copy the background, drop the background down the background layer and put it on the square icon on the right with the delete layer. Dragging that, the background will be copied successfully.

Add Layer Mask
After done with copying the background, the layer mask on it should be added to mask hair in Photoshop. Add a layer mask to work further on hair masking. To add a new layer mask, go to the layer panel and select the layer from the bottom of the layer panel. This layer mask will be joined with the background layer which will make easier to work.
For masking the photo many layers are needed. This is an easy way to hair mask image Photoshop. If you work taking different layers, you can save your time and you can do hair masking fluently.
![]()
Select Solid Color
The path of the subject will still remain selected even after adding a layer mask on the copied background layer. While the mask is selected, take a solid color for the background to remove. Go to adjustment layer on the bottom of layer panel. Click on the circle icon named adjustment layer.
You will get a dialogue box after clicking on the adjustment layer icon. On the top of the box, you will get to see ‘solid color’. You will get another dialogue box containing different colors to fill in the background. Here, we have selected black color to fill the background as the solid color. Press enter after selecting the color.
![]()
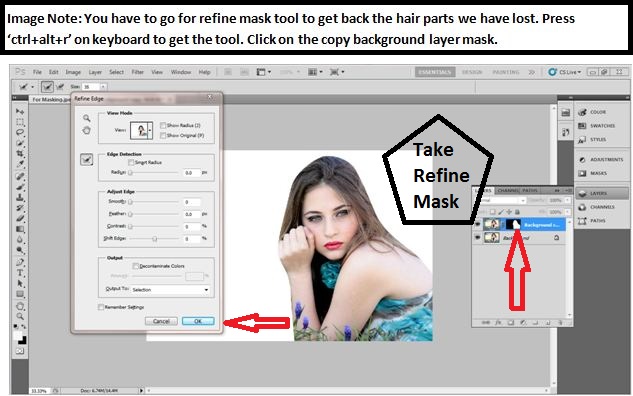
Make Refine Mask
We have got the solid color of the background which is black. Now, it is time to make the refining mask. If you notice, you will see that the entire hair of the model has not come in the photo due to the clipping path. Refine mask is needed to get the whole hair back. There are two ways of getting the refine mask in Photoshop. I will tell you the manual way at first. Go to the Select>Refine Edge. Doing that, you will get the dialogue box of refining edge. Another way is too very easy. It does not even take 2 seconds to do. Simply press ‘ctrl+alt+r’ to activate the refine mask tool.
Increasing Refine Mask Amount
We have gone with the automatic way of activating refine mask tool. We have a dialogue box right after we activated the refine mask tool. We will have to work with the refine tool now. Before that, we need to increase the amount of the refine tool so that we do not take much time to get the hairs back. You will see a slider on the refine edge dialogue box by which you can increase and decrease the amount of refining mask. We have increased the amount of refining mask. Keep dragging the tool on the photo of hair parts until you get to see all the hairs. Do not worry if you see a white layer around the subject.
![]()
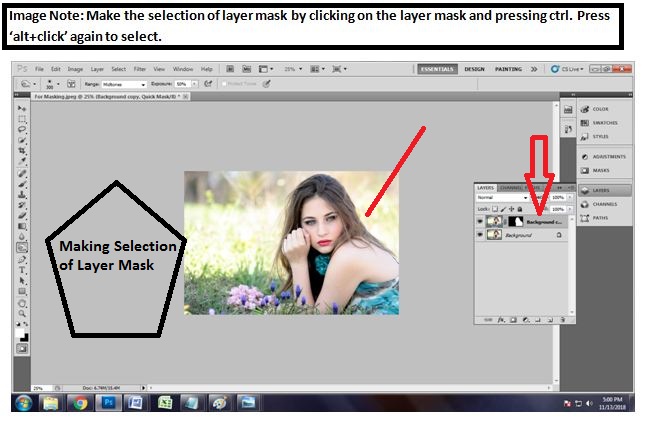
Making Selection of Layer Mask
As we have set the refine mask on the photo and hair, we will again make the selection of the layer mask. In the background copy, which has another layer in it, we are going to select that layer mask. The layer on the background copy on the right from the top, click and press ctrl+alt+click to select the layer. Keep clicking it and again press ‘alt’ on the keyboard by which the selection will be made of the layer mask.
Select Brush Tool
After making the selection of the layer mask, the most important thing is there to do. Since we have gone through refining the hair parts, the white parts are there in the hair part. To get off from the white parts, we need to go for brush tool. Select the brush tool from the toolbar or press ‘b’ on the keyboard to activate the brush tool. Select the overlay brush tool which will be very helpful to work with. Increase the size of the brush to work properly. Roll the brush tool inside the hair part so that the whitening part goes away. Do it until you see the white parts gone.
![]()
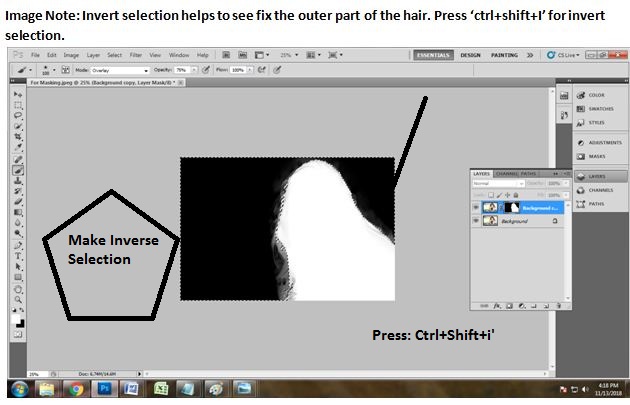
Make Inverse Selection
After getting done with the working brush tool, we have to make the selection again. But this time we are going to make an inverse selection of the photo. We will not select the masked areas, but we will make the selection of selected areas. To make the inverse selection, click on the copy background layer’s layer path and press ‘ctrl+shift+I’. Doing that, the inverse selection will be made. You will that the dots are moving but in the inverse direction this time.
Select and Work with Burn Tool
While the inverse selection is being made, activate the burn tool from the toolbar to make the last work done. Roll over the burn tool on the upper layer of the hair. Keep rolling over the burn tool until you see the refined edge of the hair part and press okay.
![]()
Fill the Background
We have got the fine and edgy hair parts which were required. Press ‘ctrl+d’ and deactivate the burn tool. You will also get the photo back by doing so. Take another layer to fill a solid color on the background. Take your desired solid color and press okay.
![]()
![]()
Conclusion
Image masking technique is one of the most puzzled techniques in the designing industry. It is puzzling because every beginner faces difficulty in starting this technique. They get puzzled or confused about the use of the black and white color. Which one hides or which one reveals actually is quite confusing at the beginning. From this article, you’ll get completely professional about how to mask hair in Photoshop cs5/cs6.