We all might have experienced a very weird grainy look in our images, which is often termed as Noise. Noise is not the best of the features that we crave for in our pictures. Everyone wants to delete the noise that is created in our desired pictures. Photo Noise Reduction can be quite difficult sometimes, if the correct method is not known. Different image editing techniques can also be used to clear noise from the product images.
What is Noise?
Noise is basically defined as deviant pixels, which refers to pixels that are not representing the color or the exposure of the panorama correctly. Noise also used to be addressed as grainy in earlier days, which sounded like it gave a better look to the image.
Why does Noise happen?
Generally noise occurs into your images when you shoot at a very high ISO setting or when you shoot a Long Exposure image. It does not mean that you cannot shoot at a high ISO setting or you cannot do Long Exposures. There are times when you have to use high ISO setting because of low light, and many landscape photographers always shoot at low light. The only important you need to know is that how you can avoid your picture from getting noisy.
Reducing Noise in-camera
To help you further, Today we will talk about some tricks on How to Reduce Noise from image. These tips will help you reduce noise while taking product images and after taking it too. Let’s start!
Lower ISO setting
Shooting at lower ISO setting means that there will be less noise in the image. There are cameras that will not cause much problem at higher ISO settings, but still, there is always a risk of noise ruining the image. Higher ISO setting orders your camera’s sensor to assemble pixels together to capture more light which can add a more grainy and noisy look to the image. You can open the aperture to its widest setting if possible, or use a tripod or flash to avoid shooting at higher ISO setting.

Check exposure
Back in earlier days, the cameras did not do a good job when it came to over exposure. However, nowadays cameras really help in Photo Noise Reduction if over exposure is used correctly. It can brighten the shadows or also pull the highlights down. Playing with exposures will give you a good idea of in how much exposure you camera can produce good pictures.

Not too Long Exposure
Long Exposures can produce great images, but it can also add noise to the image. If the exposure is too long, then the sensor of the camera can begin to heat up which will result in pixels rendering incorrect colors and exposures. To do long exposures, you need to check your camera, that how long it can maintain the long exposure and when it will turn the picture really grainy.

Use RAW Format
Majority of you might feel intimidated by shooting in RAW format, but believe me it is much better than shooting in JPEG format if you want to remove noise. You can get the best out of your images using RAW format, so be sure to use it. When the light is too dark, you can switch over to RAW. JPEG images already have compression applied to them, which means that there is already some noise known as JPEG artifacts. When using higher ISO in JPEG format, the noise can get really worse. If you are using RAW format then you will also have more flexibility in post-production. Thus, using RAW is better.

Using in-camera Noise Reduction
In most cameras, there is a function called High ISO noise reduction or Long exposure noise reduction. Turning it on can really benefit if you want to reduce noise in your image when you are shooting at high ISO or shooting Long exposures. After the image has been captured, the camera will look for any incorrectly rendered pixels and fix them. It will take time, mostly the same time as exposure time. It is really worth a try!

How to Reduce Noise in Photoshop
In this part, you will learn about How to Reduce Noise in Photoshop. Photoshop is one of the best tools to improve your image at its best. Let’s head straight into it.

How it works
After you have captured the image, you would now like to open it up in Photoshop to make sure there are no errors in it. Before you start removing the noise, make sure you zoom in the image up to 100% to see all the details of the noise in the image. After the editing is done, also zoom out to the normal size to see how the picture looks overall. Remember that a photo which has no noise, help you to boost the conversion rate of your photo.
Open the Photo
As we have chosen Photoshop to reduce the noise from the product photo, we cannot make the work done without opening the Photo in Photoshop. We have chosen Photoshop because there we can have some great tools in Photoshop. So to open the photo you can go for either automatic or manual way.

Go to File>Open, click on the required photo from the windows and press ok to open the photo in manual mode. Drag the photo in the Photoshop bar from where the photo is located to open the photo in automatic mode. In both the ways the photo will be imported in Photoshop.
Select Gaussian Blur
There are some magical tools in Photoshop which actually work magically. Gaussian Blur Tool is one of them. We are going to select Gaussian Blur. To activate the Gaussian blur, go to Filter>Blur>Gaussian Blur. The Gaussian blur tool will be activated doing that. We are selecting the blur tool because blur works great in the noisy photos to reduce noises.

Adjust Radius
Just right after activating the Gaussian Blur tool, you will get a box consists of the radius of the Gaussian blur. Here, you can adjust the radius of the Gaussian blur tool. We have adjusted the radius to the amount of 0.9 so that the photo does not become too blur. We can see the amount on the small screen too. Press enter or click on ok after adjusting the radius. The photo will get a bit blurred doing so.

Select Smart Sharpen
After blurring the photo is order to reduce the noise, we need to make the photo a bit sharpening. To make the photo sharpen, we need to activate the sharpen filter. Actually, we are going to go for smart sharpen. To activate smart sharpen, go to Filter>Sharpen>Smart Sharpen. Doing that, the smart sharpening filter will be activated and you will get a dialogue box.

Adjust the Amount
After selecting the smart sharpen option you will have to use the sliders to adjust the amount. Adjusting the amounts of smart sharpen by changing its radius value and removing Gaussian blur will help you cancel out the amount of noise from the image of the product. Try to keep the radius higher so that it decreases the noise.

Select brush Tool
To clear the noise perfectly you will need to brush on it with a color. To brush a color on the product image use a brush tool. To choose a brush tool, go to the tool bar and select the brush tool from there. The brush tool has an icon like a paint brush. If you see an icon like that simply click on it.

Choose Black Color
As I told you before that we have to choose a color and brush it over the image. For this image we’ll need a black color. To choose the black color, use the color picker tool. The color picker tool looks like a dropper. Go to the tool bar and choose the tool that has this sort of icon. After choosing the tool, click on the black area of the image and you’ll see that a black color gets chosen on the color box.

Brush over the Product Photo
The brush tool will help you to completely erase the noisy area from the product image. You will have to choose a specific color that goes with the color tone of the image. Using brush tool draw over the image and you will see that the noise is getting away. Use your mouse to draw over the product image. After drawing over it you’ll see that the image has become clear from noise.

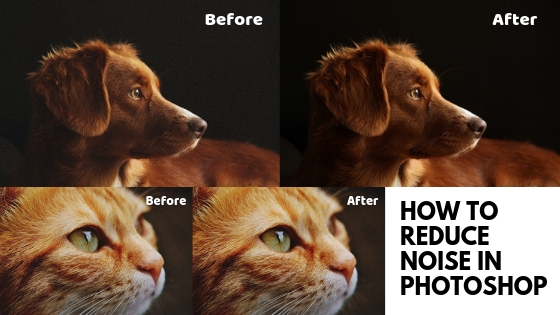
Here is the Photo After Noise Reduction

Reducing Noise in Lab Color mode
Lab Color Mode is a method that will take on Color Noise more directly while preserving as much resolution in the image as possible.
Channels- Lab
In the Lab Color mode you will notice that there is Lab instead of RGB. Lab is basically the way as we see color (as people) opposed to how a machine or device might elucidate color.
Lightness, a, b
L, a, b is basically Lightness, a, b. Lightness holds information about the Luminance, or Black and white information of the image. The channel ‘a’ holds green and magenta information and ‘b’ holds yellow and blue. ‘a’ and ‘b’ channel simply hold color information only, and Lightness layer holds any details.
Noise can be a Benefit
Think of Noise in a different way. Noise is not really that bad as we think. Sometimes to hide the ugliness of noise, we can try adding more noise. Noise can add character and interest in an image. Grain can be a great way to obtain attention and engagement from the viewer.
Practice
Photo Noise Reduction in image is not the easiest things to do, but if practiced well, it can surely just become a cup of tea. Keep practicing with different pictures with various levels of noise to assure your picture look absolutely unaffected by noise. Noise, if studied well, can be used in many ways to enhance the image.
Conclusion
There are abounding ways to Reduce Noise from image in Photoshop. Photoshop is a great tool to Reduce Photo Noise. If you are looking for subtle changes in particular areas of your image, then using channels can definitely satisfy you. However, if you whole picture is very noisy, then using channels might not be the best option as channel methods are really subtle in Photo Noise Reduction. If the noise is too much in your picture, then using other powerful software or plug-in for Photoshop such as Noise ware might help. Noise, though is not always that bad. Adding grain can really increase the personality of the image. Noise can fetch allure and attraction to an image and make the image look more Purposeful. There are many photo editing companies that can help you to reduce noise from your photographs.
References