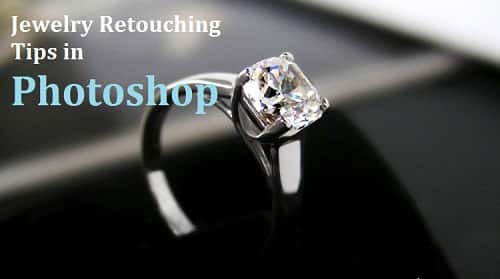
Jewelry retouching techniques is not an easy task. It is hard as well as it is creative. Whether the jewelry product is small or big, the approach should be meticulous. After the shoot of jewelry photography, there might be some flaws which can overshadow the actual jewelry product. So, the photographer needs to go for post-processing of the jewelry product. To make the jewelry photo look better, the photographers need to take jewelry retouching service which helps the photo to emerge and be highlighted. Retouching would help your photo to present in a way that you can use them for any commercial purpose.
Adobe Photoshop works tremendously when it comes on Retouching. But jewelry retouching is not easy. There are some jewelry retouching techniques in Photoshop which provide you high-quality jewelry image retouching image.
Here are a few Jewelry photo retouching tips that can help you to enhance jewelry photo in Photoshop
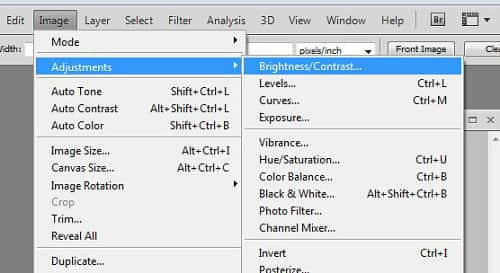
Adjust Color Balance
Some photographers may prefer adjusting the color balance of getting the white balance in the camera setting rather than adjusting in Photoshop. But if you are up for setting the color balance in Photoshop, there is no doubt that you will get a great result. Here are some simple steps which will help you to adjust the color balance rightly in your jewelry image.
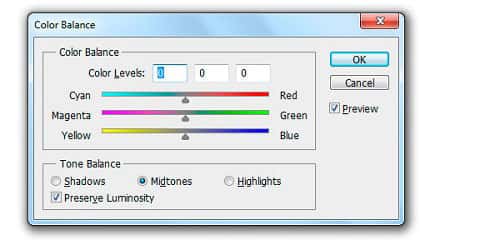
Step 1: Open Adobe Photoshop
Step 2: Import the jewelry image
Step 3: Go to Image>Adjustment>Color Balance.
Step 4: Select any of the colors using the sliders of the box and press OK.
Brightness And Contrast
Adjusting Brightness and Contrast of a jewelry image is an important aspect when it comes to retouching jewelry photos. There are few techniques in Photoshop which are effective to adjust brightness and contrast to the jewelry photograph. One way I am going to describe through few easy steps below.
Step 1: Open a jewelry image on Adobe Photoshop
Step 2: Create a new layer
Step 3: Go to adjustment layer and select brightness/contrast
Step 4: Adjust required brightness/contrast by the slider and press OK.
There is another way of adjusting brightness and contrast. It is to create an entire adjustment layer and work underneath. The professionals usually go through creating an adjustment layer because it is easy to use and takes lesser time. You just have to click the half black and white circle of the pallet which will create brightness and contrast adjustment layer.
Use Unsharp Mask
Jewelry photos sometimes look very sharp for the edges of the stones or metals. Jewelry image retouching helps to make the jewelry image smoothen by the Unsharp mask. Unsharp mask is another retouching tool of Photoshop which is mostly used by professional image editors. Activating unsharp mask is very easy, go to Filter>Sharpen, the tool will be activated successfully.
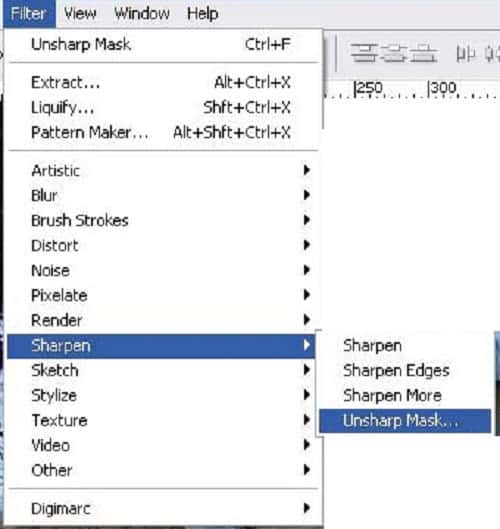
After activating the tool, you will get 3 sliders named Amount, Radius, and Threshold which helps you to adjust the amount of sharpness. You can increase or reduce the value of the darkness of the pixels. Adding the value by the radius will give your jewelry photo a required sharpness or smoothness.
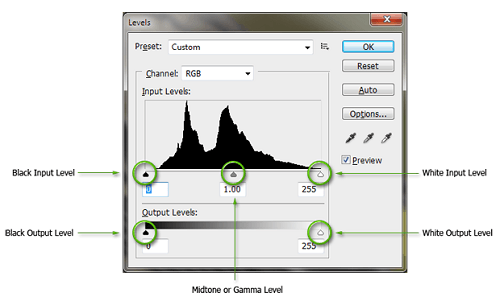
Level
The next thing comes up on jewelry image retouching is to adjust the exposure. An adjustment layer is very helpful while jewelry image retouching. You will get the exposure option for making the correction of image exposure. Here are the steps of getting the exposure tool
Step 1: Select an Image
Step 2: Go to Image from the menu bar
Step 3: Go to Adjustment>Levels and press Ok.
You will get a histogram box containing the sliders by which you can adjust the level of the exposure to the image. Adjust the levels of the exposure by the help of sliders accordingly and press ok.
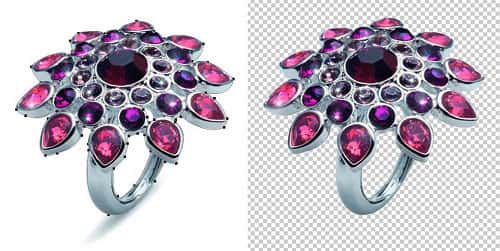
Grab The Pen Tool
Jewelry photo retouching does not happen only within the object, backgrounds also need retouching. One unique type of retouching we can do with both background and the jewelry object by applying image clipping path service. Removing the background and keeping the object in the same shape is difficult to do without clipping path. The clipping path processed images can be used in different websites and advertisements. To make clipping path to the jewelry image, you need to follow some steps which are described below.
Step 1: Open an Image
Step 2: Select ‘pen tool’ from the toolbar or press ‘p’ to activate the pen tool
Step 3: Take a path named ‘path 1’
Step 4: Draw clipping mask around the object
Step 5: Press Ctrl and click on the path
Step 6: Press ‘q’ to get the background removed.
Clipping path service will give you the exact shape you want and also the gemstones will also be in the same shape. It is important to get in the same shape so that the value of the image does not fall.
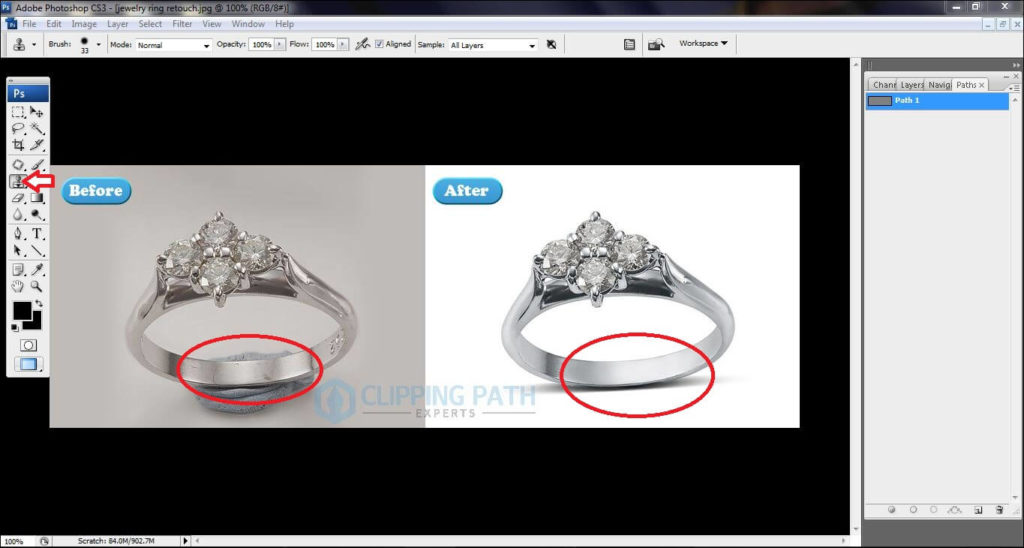
Removing Unwanted Spots
One major thing in jewelry image retouching is to remove the unwanted spots from the jewelry image. There might be some ugly looking spots on the jewelry product which was not noticed during a photo shoot. The photo may look very gaudy just because of the spots. Adobe Photoshop has few tools by which you can actually remove all the unwanted spots. There are few brush tools named Healing Brush tool, Spot Healing Brush tool, Clone Stamp tool etc. Using these tools on the spots of the jewelry image will help you to get spotless jewelry image.
In all the retouching services, jewelry image retouching is one of the toughest services. You need to be more focused while retouching jewelry images cause it is very sensitive. You can the best high-end jewelry retouching with Clipping Path Experts. These tips from us will definitely help you to get perfect jewelry image by retouching.