There are different types of photography happening in the world. Portrait, Landscape, Candid, Documentary, Fashion, Food etc. are the parts of photography. These photography feature people, scenery or Products (ex: Clothes, Accessories, Shoes, Electronics, etc). Product Photography is one of the most difficult yet cheaper photography. It is mostly used for showcasing the product in a better way. Product Photographers always want to make the product emerge from the main object isolating the background of the product.
They try hard to present the product to the clients so that the clients get satisfied with their work of product photography and approve the photographs by seeing that the main focus is the product. Sometimes product photographs come out as a bad result in which the product doesn’t seem appropriate.
Therefore, the product photographers need the help for product photo editing. Product photo editing itself is not an easy task. You need to know many things to increase the quality of a product photo. You need to choose a correct software/application for product photo editing which has enough tools and techniques which will emerge your product on the photograph. These are the Photo Editing Tips for Product Photographers that you must follow.
![]()
Here, in this article, I am going to give you some tips regarding product photo editing using the best application, the best tools, and the best techniques.
Choosing the best Software/Application
When you are done with product photography and you are not happy with the photo, you have to go for photo editing. While photo editing, you have to choose the editing application carefully. Choose the app which has sufficient tools and techniques. I would suggest Adobe Photoshop and I give Adobe Photoshop the top rank as an image editor. Adobe Photoshop has some amazing tools by which you will be able to edit the product image in every way. So, you should go for Adobe Photoshop at the first place in case of editing product photographs.
Various Tools and techniques for Product Images
While editing the product photo, there can be different faults in the photograph, which should be fixed by using the tools and techniques of the application you choose. As, I have chosen Adobe Photoshop here, so I will talk about the tools and techniques of Photoshop. You must know which tools and techniques should be used for different problems of the photographs and how to apply them. Each tool works on each different aspect and each different sides of the photographs.
Ex: After shooting for the product, you did not like the background of the product and you want to change that. Photoshop clipping path will help you to remove the background. So, clipping path would be the suitable tool to remove the background.
You should know what the techniques are and how and where to use each technique in Photoshop. Here I will discuss how the tools and techniques of Photoshop help to Edit Product Photography. There are some photo editing tips for product photographers.
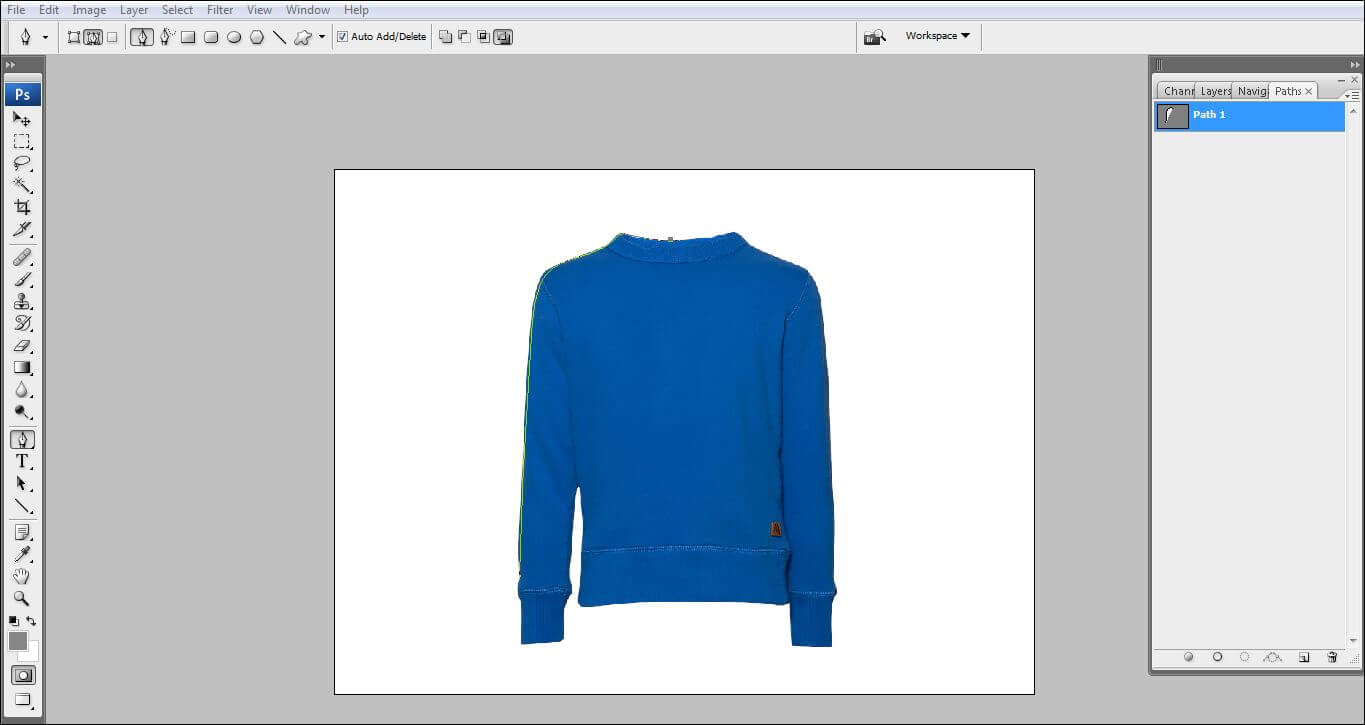
Background Removal
The product is the key to a business company. The background of a product in product photography is like a backbone to its photograph. Post photo shoot of the product photography, the photographer or the client might get dissatisfied by seeing the poor background image which is not suiting the product at all. So the photograph should be edited under the clipping path or the background removal service. Background removal service helps to isolate the entire background from its object using the pen tool. Drawing a fine line around the object and selecting it will get your background removed precisely and easily.
![]()
Removing Unwanted Spots
In a product photograph, there might be some spots either on the product or in some part of the background. There is one amazing technique in Photoshop which magically helps to remove the unwanted spots from the product image is called image retouching. The spot in a product works as a turn off for the customers when they see it online. Photoshop Image Retouching gives the opportunity to clean the product image by removing the spots and make attractive. This work is done by using various tools like clone stamp tool, healing brush tool etc.
![]()
Adjusting and Changing the Color
Color gives a soul to an image. The color is the most important aspect in a product photograph. When you are using the product photograph for marketing purpose, the original color of the product should be visible in the photo as well. A dull photo may ruin the entire photo, thus your product might get rejected by the customers when they see a lifeless and dull photo. Photoshop Color Correction is the best way to put the best color and adjust it in a right way. There is a large number of tools for adjusting the color in Photoshop. There is a tool named adjustment tool. You will get many color correction options from there. You can adjust color, hue/saturation, contrast, brightness, exposure etc. You can also put B&W effect on the product Photo.
On the other hand, if a photographer or a client thinks that they need the product in different colors when they do not have the physical products of other colors. It is possible to show the product in different colors by using Photoshop. Photoshop color correcting can give you any color you want. You just have to choose the color in a different layer, color the product by using paint tool and select the color mode. It will help you to change and give you different colors of the same product which you can use it while advertising.
![]()
![]()
Adding the Shadow
A shadow on any photo indicates a natural instinct of the object. In the case of product photo editing, adding a shadow gives a natural a classy look to the product. It is a tough task in image editing. The reason behind that is, you have to be very careful while creating a shadow. The shadow has to be in a perfect size and the distance of the shadow from the object should be perfectly done. Only then the product photo will look natural. To add shadow, you have to create a clipping mask of the object first. Then you have to create a new layer and you have to copy the masked area of the product. Then add the shadow according to the requirement of the product image.
![]()
Give images a perfect size and format
After the photos of the product are shot, you might not get the right size and the format of the photograph. The size you clicked the photos in, might look inappropriate and the quality might get spoiled. To give a perfect size to the product image, you need to go for resizing which is also a part of image editing. Open the image in Photoshop and press ‘ctrl+alt+I’ and you will get a box of the size. Write any of your required size and press Enter. You will get the perfect size of the photo doing that. You can save the image in different formats too. It can be either JPEG to PNG, from PNG to ei, from PNG to JPEG etc.
![]()
Using these techniques, a photographer can edit the product photos like a professional. A photographer, who is willing to edit the photo as a professional, should also know about the keyboard shortcuts. The keyboard shortcuts will help the editor to edit the photos faster, which will save the time of the editor and it also saves the energy to edit product images.
![]()
Editing a product image professionally is very important if you want to sell the product by a virtual media. You can use the photos in different mediums such as e-commerce websites, magazines, posters, banners, leaflets, billboards etc. These images will create a brand name and will help you to increase the conversion rate of the company.


