Only a photographer knows how difficult it is to capture the falling rain in a photograph. To capture the rain in a photograph a lot of adjustment needs to made while camera setting. You’ll need to capture a lot of images in order to get the perfect one. This is why in most of the photographs captured during rain the subject seems to be wet but there is no sign of the rainfall. As it is really hard to capture the fast falling rain drops. But what if I tell you that there is a way you can add an artificial rain effect to your photos using Photoshop? Yes in this article I’ll show the secret and easy way on how to add rain effect in Photoshop. We’ll use the creating and adding an overlay technique to do this kind of effect using Photoshop.
You can check other ways of adding overlays here –
How to add bokeh overlay Photoshop
10 wedding overlays Photoshop
You can use any version of Photoshop starting for CS5 to CC20 for doing this type of rain effect in Photoshop. So without further adieu, let’s start!
Open the Photo
![]()
To edit photo in Photoshop, you need to open the photo at first. Without opening or importing the photo, it is not possible to edit photos. Open Adobe Photoshop in your windows and snap on File>Open. You will get a discourse box of windows from where you have to go to the necessary drive and choose the photograph. Snap on the photograph and press enter or click on select. The photograph will show up on the screen of Photoshop.
Another simple thing you can do to open the photograph which will take just a couple of moments. Go to the windows drive and open the record area. Snap on your necessary photograph and drag the photograph into the Photoshop bar. It will take a small amount of second to import the photograph in Photoshop.
Create a New Layer
![]()
After opening the photo, you will see the background layer is there. But to add effects, we need to work on a new blank layer. Press and hold the Alt (Win)/Option (Mac) key on your console and snap the New Layer symbol at the base of the Layers board. Holding the Alt (Win)/Option (Mac) key advises Photoshop to pop open the New Layer exchange box where we can name the layer before its additional. Name the layer “Rain”, and afterward click OK to close the exchange box. You will get a blank new layer to work on.
Fill the Layer

As we have taken a new layer, we are going to do further work on it. Now it is time for filling the new layer and hiding the background layer under a new filled layer. We have to fill our “Rain” layer with black, and we can do that utilizing Photoshop’s Fill option. Go up to the Edit menu in the Menu Bar and pick Fill. Clicking on that, you will get a dialogue box where you will have option of what color you want to fill the layer with and what amount. Select black from the dialogue box, keep the blending mode normal and opacity on 100% and press enter. Doing that, you will get a black screen as new layer.
Add Noise

We are going to use lots of dots or noise to add rain effect in Photoshop. In that case, we need the help of noise filter of Photoshop. Go to the Filter bar and click on noise. Clicking on noise, you will get a dialogue box including come options and click on ‘add noise effect’ from there. From the box you will get from the noise box, adjust the percentage as per your requirement and press enter or click on OK.
![]()
Select Screen

After adding the noise to new layer, you need to see how the noise looks on the photo. You need the help of blend option. Go to the layer panel and click on the blend option. Clicking that, you will get some blend options. Select ‘screen’ by clicking on that and you will see the noise in your original photo.
After selecting screen the image will look like this –
![]()
Convert to Smart Object

Now after you select screen you’ll see that the small dots doesn’t look like an original photograph of rain. To make it look real some other adjustments needs to add to it. To make sure the image doesn’t get harmed during the process it needs to get converted into a smart object. A smart object is way to make the layer editable multiple times. You can undo or redo the adjustments using smart filters on a smart object. To make the new rain layer a smart object Choose the rain layer > Layer > Smart objects > Convert to smart object. Then your layer of the fake rain will become a smart object.
Use Motion Blur Filter

Rain doesn’t fall as dots like snow it has a speed of falling which shows the trails of the rain drops. To make the rain layer real you’ll need to bring rain trails into action. You can do it by using a motion blur filter. This will show the falling motion of the rain drops. To add this filter select the rain layer > Filters > Blur > Motion blur.
Adjust Motion Blur
![]()
Now you’ll see a pop up tab for adjusting the motion blur of the rain effect layer. Change the angle to 50 degree or anything you like so that it may seem like actual rainfall. Keep the distance between 13 to 15 pixels. Then hit ok to apply the rain effect motion blur filter.
Adjust the Level
![]()
Now to make the overall image look actual go to the adjustments options and change the level of the brightness and darkness of the image. This will show the rain effect clearly and perfect. Then you are done in the process to add rain effect in Photoshop.
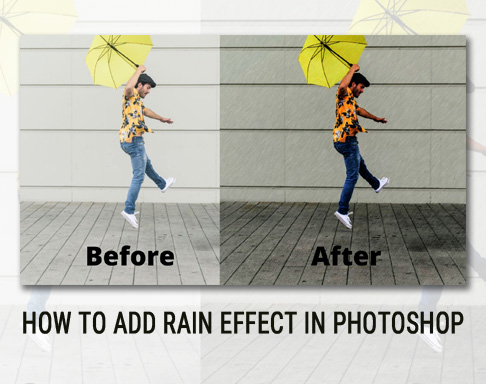
Before vs. after

Here is how the rain effect image looks after it has been added to the photo it was before. Make sure you practice this technique to master it. Then you can also add rain effect to your photos.
You can also see these tutorials for a brief knowledge of the rain effect technique –
Rain Effect | Photoshop Tutorial
Rain Effect | Photoshop Manipulation Tutorial Part1
Rain Effect | Photoshop Manipulation Tutorial Part2