Are you a photographer or photo editor? Do you want to do something that you have never done before? Then you should definitely try making a tiny planet in Photoshop. A lot of creativity can be done using Photoshop if you have an urge to do something different. If you know some creative photography tips and you should also know some creative photo editing ideas. If you want to see a tiny planet through photo editing, this tutorial will help you for sure.
So here is a tutorial on how to make tiny planet in Photoshop below
Open the Photo
Before everything, we have to import or open the photo in Photoshop in order to make tiny planet in Photoshop. But there’s a catch. The catch is, we need to select a panoramic photo to make tiny planet because panoramic photo shows you 180 degree of the scene. To open the photo in Photoshop, go to File>Open. You will get a dialogue box of windows. Go to the location where your required image is located. Click on the image and press enter on your keyboard or click on ok. Doing that, the photo will be opened in Photoshop.
You can also get the photo in another easy way in Photoshop. You just need to go to the file location remaining the Photoshop application opened. Click on the photo and drag the photo to the Photoshop bar. Doing that, the file will be opened within few seconds.

Unselect Constrain Proportion
As you can see that the height and width of the photo is not equal. In order to make tiny planet in Photoshop, you need to make the height and width of the image equal. To do that, go to image>Image size. You will get another dialogue box by doing that. Everything in the bottom of the box is selected. You cannot get the same height and width of the photo if the constrain proportion is selected. So unselect constrain proportion from the box to unselect.

Make the Image size equal
After unselecting constrain proportion, now you can put the image size however you want to. Here, we have adjusted the height and width of the image by 1000px. Write 100px on both height and width. You will get the equal height and width size photo by doing that.
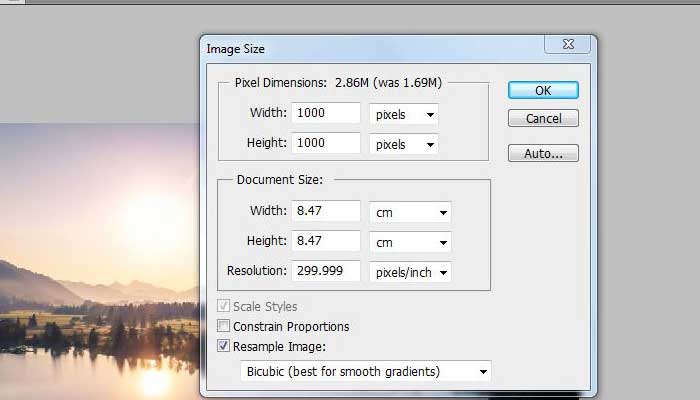
Here is the Photo after Resizing

Rotate the Image
The next thing you got to do is the rotation. You have to rotate the entire photo to get the tiny planet. Go to edit>transform>rotate 180 degree to rotate the full photo. It is important to rotate the photo in 180 degree so that everything gets perfectly. Doing that, the entire photo will be rotated.

Here is the Photo After Rotating

Select Polar Coordinates
Filters play very important part in Photoshop to edit photos in various ways. And even here, filter will play one of the main roles to make tiny planet in Photoshop. We need a specific filter to apply which is polar coordinates. Go to filter>distort>polar coordinates. You will get another dialogue box of polar coordinates and the filter will be activated.

Click on Rectangular Polar
As you can see that the photo is looking kind of different. Click on rectangular polar on the dialogue box and click on ok to make the perfect tiny planet in Photoshop.
Here is the Final Photo of Tiny Planet

Conclusion
As you can see above, how easily you can surprise everyone by making tiny planet in Photoshop by yourself. There are different photo editing companies who do a lot of other photo editing things. But this one is very unique and different. So try making tiny planet in Photoshop applying these 6 simple steps. Good Luck!