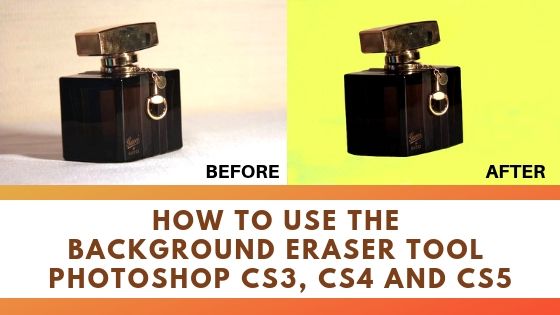
The innovation of Photoshop without a doubt has greatly helped to ease the work of all the graphic designers and photo editing services. Photoshop has been one of the greatest inventions by the Adobe Company till now.
With its set of specialized tools, a designer can edit almost any sort of image turning it into anything. This is the magic of Photoshop.
There are like different types of tool available on Photoshop which allows an editor to apply some special editing techniques like – Background erasing, Photo manipulation, image retouching, logo designing, Photo restoration etc.
Among these techniques, the most used one is the background removing technique. There are different types of tools available to do this too. The most widely used background removal tool Photoshop is the Background Eraser Tool.
It gets used widely because of its flexibility and efficiency. For beginners, it seems a bit difficult to use it but relax!
Because, in this article, we’ll show you the complete technique in steps for removing a background using Background Eraser Tool In Photoshop.
But before starting it would be very helpful for you if you check the other ways you can use to remove the background of images using Photoshop.
Here are the articles about it –
- Change Photo Background to White Using Photoshop
- How to mask hair in Photoshop cs5 | Mask image Photoshop
- Change Photo Background in Photoshop
So without waiting further, let’s start!
Photo Importing
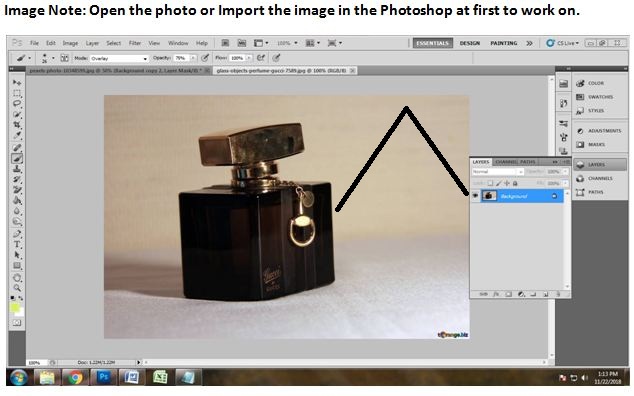
For every photo editing company or individual who loves editing photos, Photoshop has come to them like a magic wand. We are going to remove the background of the photo using Photoshop. To remove the background, we have to go through some steps before that. The first step is to open or import the image in Photoshop.
There is more than one way of opening the photo in Photoshop. Both of the photo opening systems are very easy-to-do. One is an automatic system and the other is the manual system. In a manual photo opening system in Photoshop, you have to go to File>Open. You will get a windows box from where the locations of the photos will be available. Go to the drive where your required photo is located. Click on the photo and press ‘enter’ on a keyboard. The photo will appear on a screen. The easiest way of opening the image in Photoshop is the automatic way. In this system, you just have to go to the file location and drag the image to the Photoshop bar. But Photoshop must remain open. Doing that, you will be able to open the photo in Photoshop.
Copy the Background
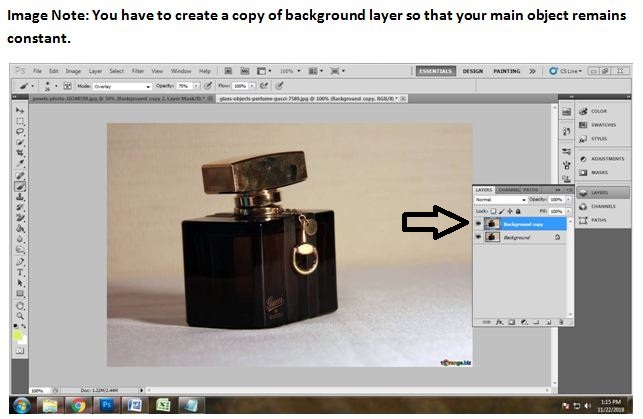
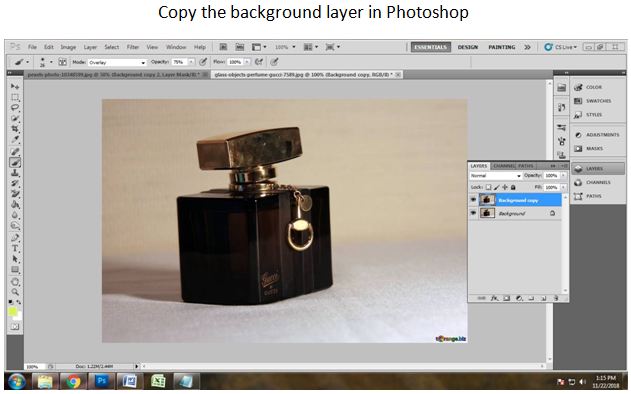
After opening the image in Photoshop, you will see that a background layer has automatically created in the layer panel. To erase the background in Photoshop, we have to do some additional work which starts from taking the copy of background layer. We will mostly work in the background copy layer. To copy the background layer, drag the background layer to the square icon next to the delete layer (2nd from the right). When you will drag the background layer in the create a new layer tool, another new background layer will be created named background copy. This really helps to edit images more and the background will also be constant.
Take Vector Mask
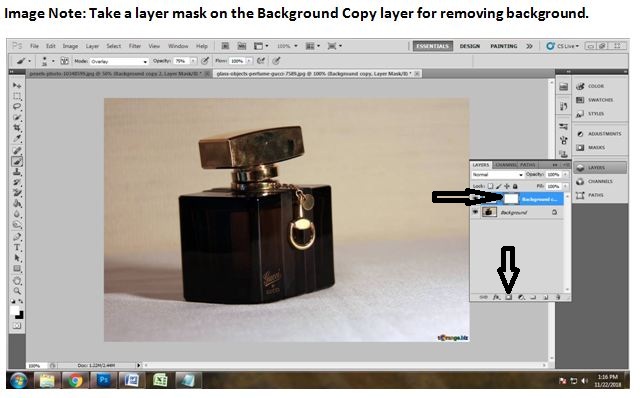
After creating the copy of background layer we need a vector mask now which is going to help to make the first photo shape of the subject constant. So we are going to add a vector mask on the background copy in the layer panel. To do that, click on the copy background layer and then click on the ‘Add Vector Mask’ icon which is located on the bottom of layer panel in third right hand from the right. This icon is also in squared shape. Doing that, the vector mask will be added and will appear with the background copy. You will see that the vector mask is white colored which is the default of Photoshop.
Take Solid Color
Since we are going to remove the background using the eraser tool of Photoshop, we have to select a specific color of our choices. We are not going to choose any pattern, solid color is best to remove the background of the image by the help of Photoshop eraser tool. Again, click on the copy background and go down to the layer panel and click on an adjustment layer. The circled icon on the middle of the layer panel from the bottom is named as the adjustment layer. Clicking on the layer panel, you will get a dialogue box where you will get to see a solid color on the top of the adjustment layer.
You will get another dialogue box of various colors after clicking on the solid color. You can select any of the colors you want to choose. Here I have selected lemon color for coloring the removed background and get the new one. Click on the color you want to choose and press enter. Doing that, you will get another layer where you will see the color.
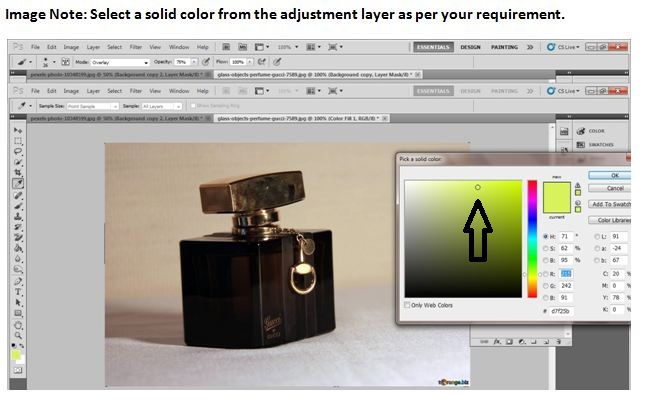
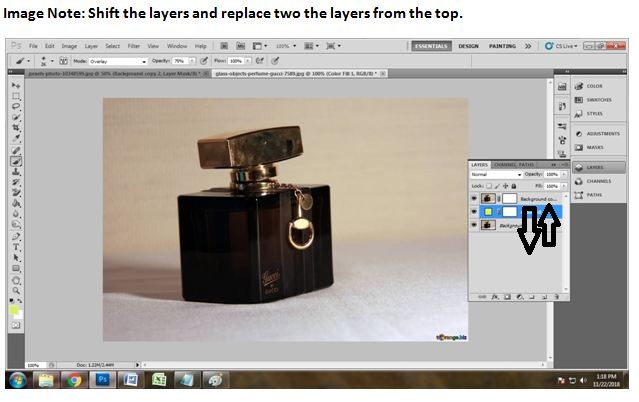
Shift the Layers
So we have the solid colored layer named color fill 1. To work further for removing the background, we are going to shift both the layers from the upper side. Replace the background copy layer to the color fill layer. Click on the color fill layer and drag it down to the background copy layer. This will make easier to work for removing the background. When you will fill the color into the background, you will be able to do that without any hurdle. So shift the layers before going further.
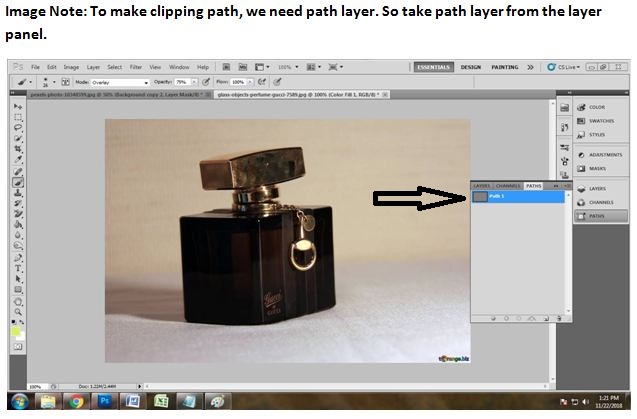
Take the Path layer
After shifting the layer, we are going to create a photoshop clipping path over the subject we have. For that, we have to take a path layer to work. To take the path layer, go to layer panel. In layer panel, you will get some other options. Select ‘paths’ from the layer panel. Click on paths. You will get another box immediately as a path layer. The layer will be automatically named as ‘path 1’.
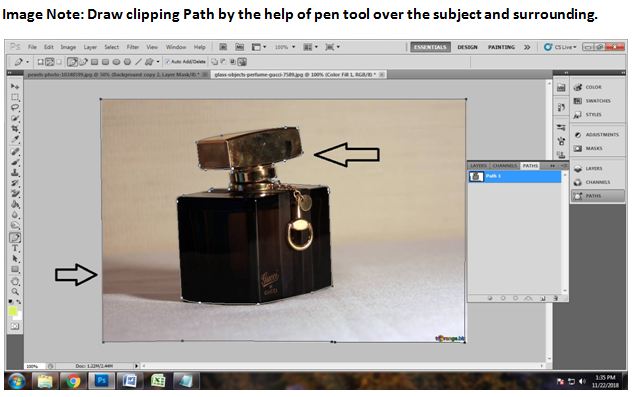
Draw Clipping Path
Now the time has come where we are going to do the most important work which is clipping path. Drawing a clipping path is important because it helps the most to remove and replace the background in Photoshop. There are several background removal tools in Photoshop. But Photoshop pen tool is the best to work for clipping path. Activate pen tool by pressing ‘p’ on the keyboard. Now start drawing clipping path over the subject.
Here, we will not only draw the clipping path over the subject but also we will draw clipping path over the surrounding areas. We will do this because we are going to remove the background with background eraser tool in Photoshop. At first, draw the clipping path over the subject keeping the subject in a perfect shape, then go for drawing clipping path on the surrounding. Make sure that you have placed the anchor points in right positions and do not forget to close the paths with anchor points.
Make Quick Selection
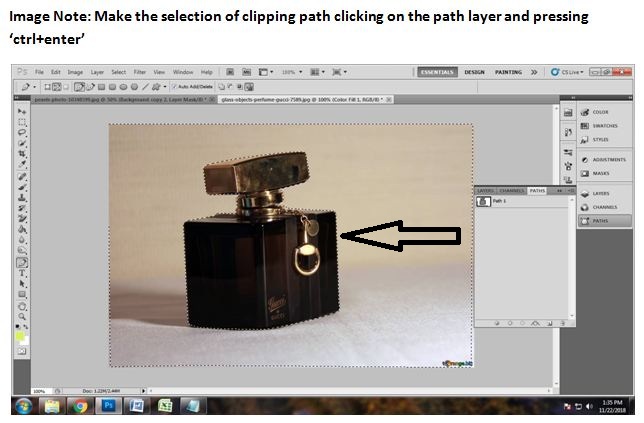
The next thing we are going to do is making the quick selection of the clipping path we have drawn. Quick selection helps you to remove the background efficiently. So to make the quick selection, click on the clipping path layer. Press ‘ctrl+enter’ to make the quick selection. Doing that, you will get to see many dots which are moving like ants over the photo. That is the proof of your photo is selected.
Select Background Copy
After selection of the path, you will now have to select the background copy layer from the layer tab. We are choosing this layer because this layer has the image of the object which is the perfume. We’ll remove the background of this layer so that the layer below it which has the solid yellow color will then become the background of the object. So, choose the background copy layer from the layer tab using the mouse right click.
Activate Eraser Tool (Take Background Eraser Tool)
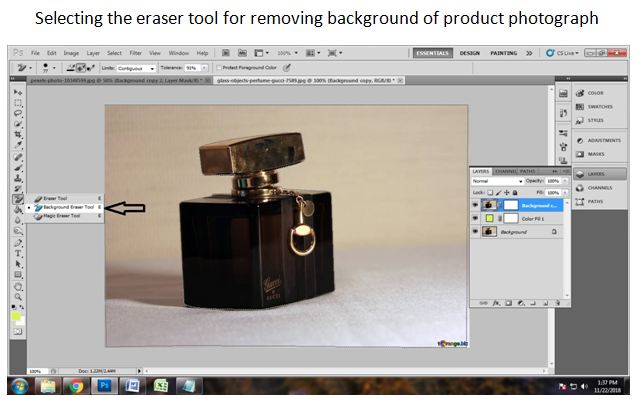
After selecting the background copy layer now you will have to erase the background of it using the background eraser tool. For that, you will need to activate the background eraser tool. To activate the tool you will need to go to the toolbar. Then, go to the eraser tool and right click on it then you will see three tools on the drop-down menu. Choose the eraser tool that has an icon of an eraser with a scissor. This is the background eraser tool.
Adjust Limits and Tolerance Level
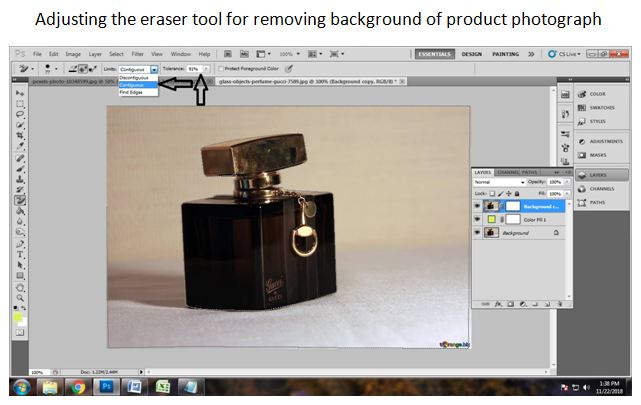
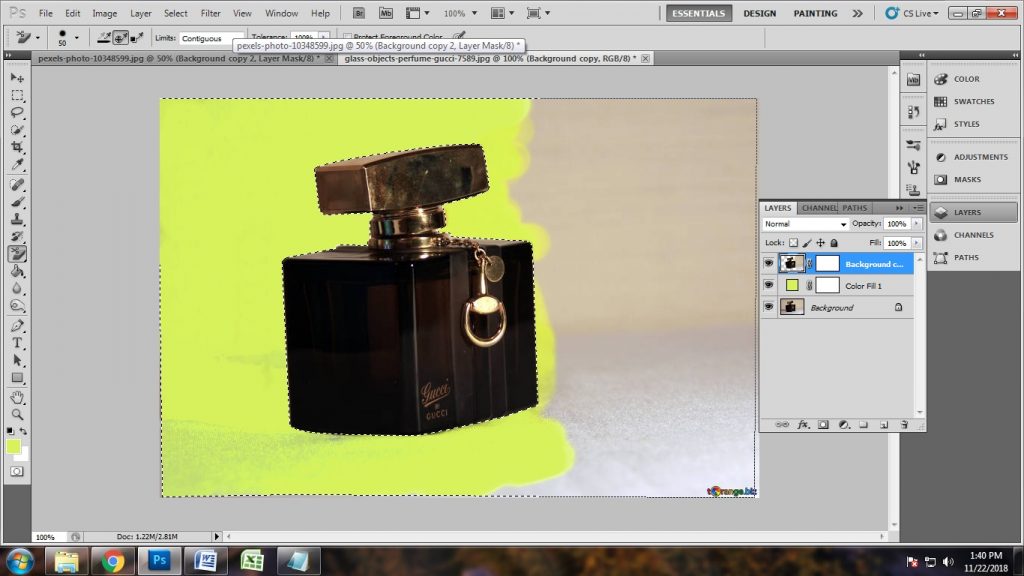
After selecting the eraser tool you will have to adjust the limits and tolerance level of the tool so that you can remove the background smoothly. To adjust them go to the upper bar where you will see the eraser adjustments. Click on the limits option and choose a contagious option. Set the tolerance level to 91%. Then you can now remove the background of the perfume easily and smoothly.
Use the Eraser tool
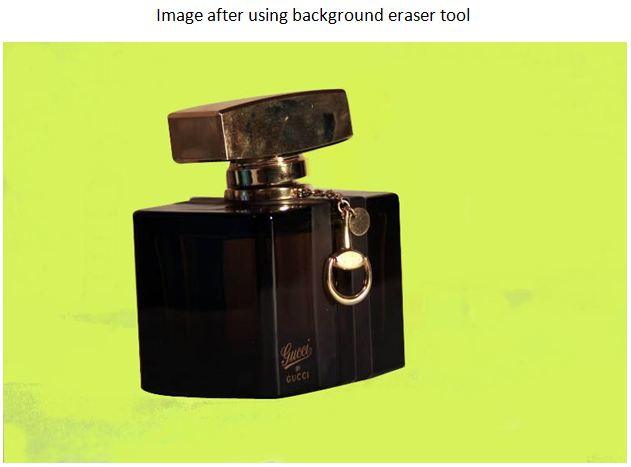
After selecting and adjusting the background eraser tool you can now remove the background of the background copy layer. All you have to do is to left click on the mouse and keep holding it while erasing the background by moving the mouse all over the image. Soon, you will see that the background has been changed into the yellow solid layer background. This way you can change the background of the image using a background eraser tool.
This is how it looks while erasing the background –
This is how it looks after removing the background –
Conclusion
Background removal service is the topmost purchased image editing service around the globe. Many professional designers are earning great revenue by providing this service to various clients. Many e-commerce businesses are hiring such designers who are an expert in this area. Therefore earning from becoming a graphic designer is very easy and flexible.
This technique of removing background using a background eraser tool in Photoshop can help you a lot to earn from various marketplaces and e-commerce website owner only if you can become a great designer.

