It is not all the time that a person would want a photo to be noisy and grainy. But recently noisy and grainy images are becoming trendy and going viral socially. This is why most of the professional photographers are trying to capture such grainy images using higher ISO levels of their camera. But getting a proper grainy image that doesn’t destroy the natural look of the image is a bit tricky and tough. So the photographers are adding this grainy effect in Photoshop. With the use of Photoshop it is now easier to do a lot of unique photo editing techniques in minutes.
You can do these cool photo editing tricks using Photoshop in minutes –
How to create soft glow effect using Photoshop cs5
How to do color correction Photoshop cs5
How to add rain effect in Photoshop
How to add bokeh overlay Photoshop
Same goes for adding grainy effect in Photoshop. You can easily do this with your photos using your Photoshop. Therefore, if you want to know that “How to add grainy effect in Photoshop” then without any hesitation check out this article and get the idea of adding grainy effect to your images in minutes.
Steps on how to make grainy effect Photoshop –
Open image
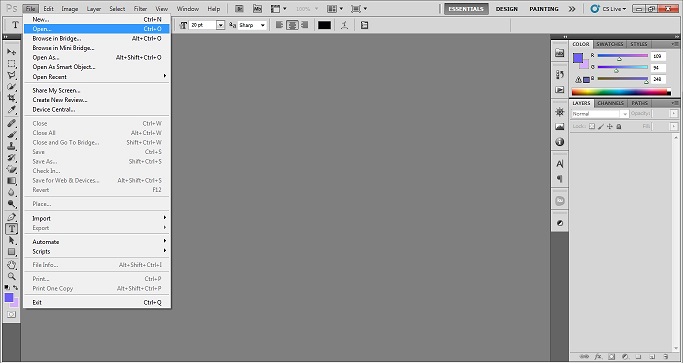
While editing the photo, you need to choose the best application/editor to edit. Here we have chosen Photoshop for grainy effect Photoshop. To start editing, we must open the photo in Photoshop. There are two ways of opening the photo in Photoshop. Open Photoshop and go to File>Open. You will get a dialogue box of windows. Go to the location where your required image is located. Click on the image and press enter on your keyboard or click on ok. Doing that, the photo will be opened in Photoshop.
There is another very easy way of importing photos in Photoshop. You just need to go to the file location, click on the photo and drag into the Photoshop bar. The photo will be appeared on the Photoshop screen.
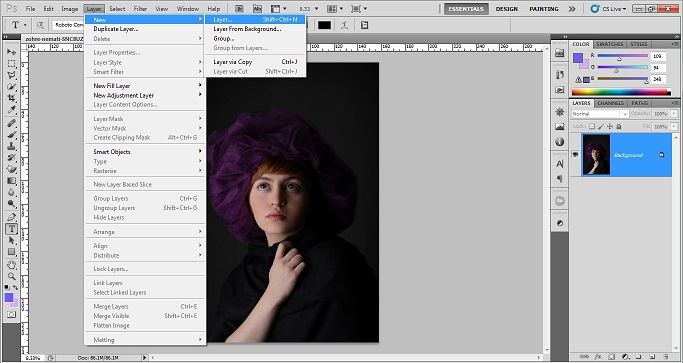
Add new layer
After opening the photo in Photoshop, the next up you have to do is to add a new layer to it. As we already have a background layer, we will continue working on the new layer. Go to the menu bar and click on Layer. Doing that, you will get some options but you need to click on New>Layer from the options. You will get a new layer by doing that. So here you start your further works.
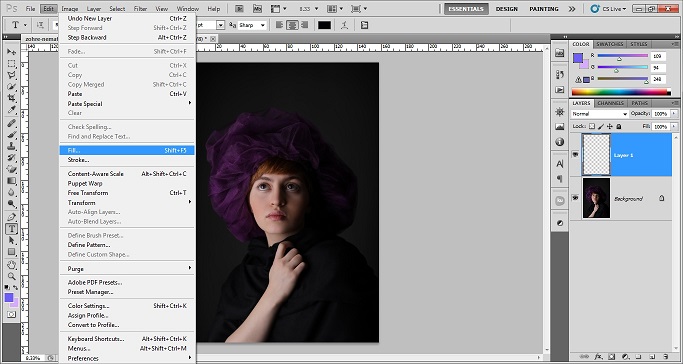
Choose fill layer option
Continuing working with the new layer, we need to fill the new layer to get the effect on the photo. Filling the layer is the smart option you can go for. To fill the layer, go to Edit>Fill.
Choose 50% gray
After clicking on fill from the edit option, you will get a dialogue box where you can choose the color option and can adjust the amount to fill in. We need to fill the layer with 50% Gray. Clicking on use, you will get a few options. Click on ‘50% gray’ from the options and click on ok.

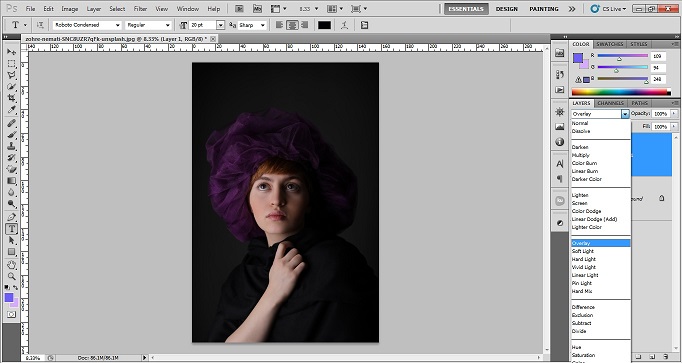
Change blending mode to Overlay
As we have filled the new layer with 50% gray, we need to change the blending mode for the photo. Go to the layer panel. You will see an option written normal just right down the layer. Clicking on that, you will get many options. Click on overlay from the options. The photo will get an overlay effect by doing that.
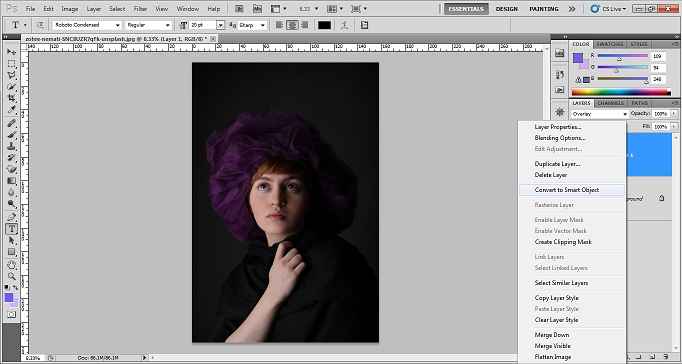
Convert to smart object
Now before we start to apply any more filters on this image we have to make sure that it doesn’t destroy the data of the image. If you also want to know how to make grainy effect Photoshop without destroying the image you’ll also have to convert the grainy effect layer to a smart object. To convert it you’ll have to select the layer then right click on it. You’ll get a list of options from where you need to choose ‘Convert to smart object’ one. This will turn your layer into a smart object where all the filters will get applied smoothly without harming the actual layer.
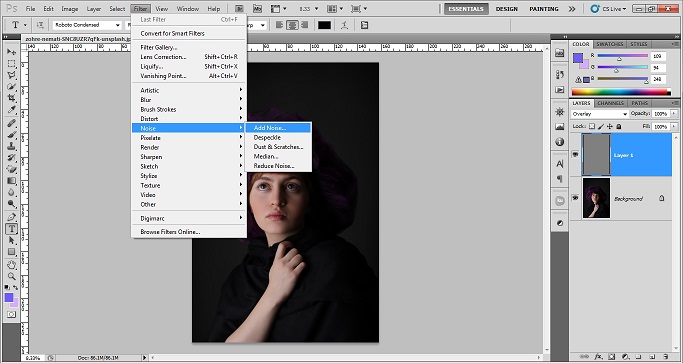
Add some noise
Grainy means a little bit of noise in the photo. Noise can be applied to the grey layer easily with the help of the smart filters in Photoshop. The grainy filter Photoshop is actually the noise filter. You can add this noise by going to the Filter > Noise > Add noise. This way you can now adjust the noise.
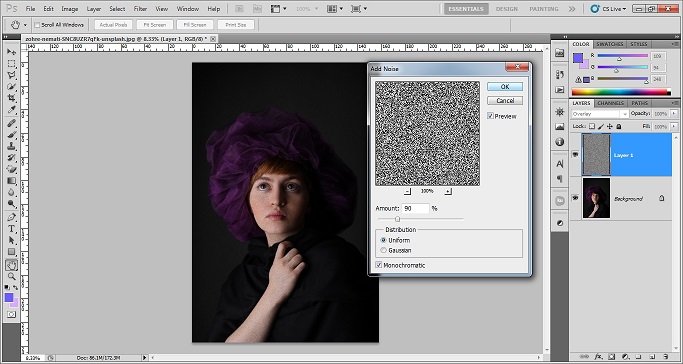
Adjust noise
After you find the noise filter you can now with a little hard work adjust the quantity of the noise you want in your image. To add a proper grainy effect in Photoshop the noise needs to be perfectly natural. After you choose the add noise option you’ll get a pop-up tab where you will get a slider to adjust the percentage of the noise. Take the slider to 90% for this image. Choose the distribution ‘Uniform’ and tick on the monochromatic option. This will give an evenly distributed noise on the image.
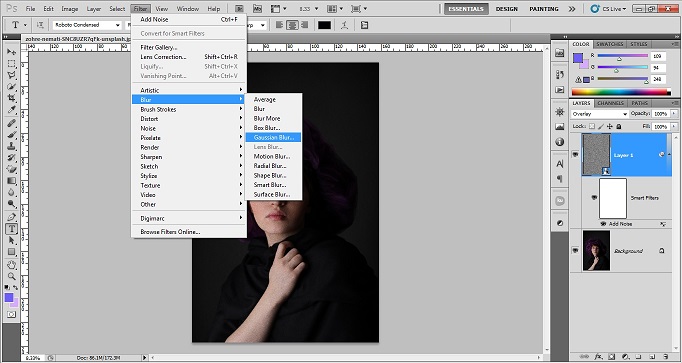
Add Gaussian blur
Adding noise can make the subject look a bit hazy. To decrease this haziness with also keeping the noise perfect you can add Gaussian blur to it. To apply Gaussian blur you will have to go to Filters > Blur > Gaussian blur. Now you will have to adjust it.
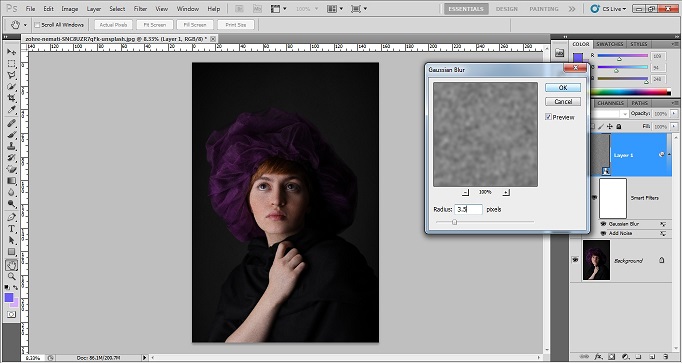
Adjust Gaussian blur
In this Gaussian blur adjustment for a perfect grainy effect in Photoshop you’ll need to keep the blur level to somewhat between 0.5 to 4 pixels. We have chosen the 3.5 pixels for our image. You can adjust this pixel using the slider on the adjustment tab of Gaussian blurs. After adjusting the blur your image is ready and has a grainy effect Photoshop.
Before and after grainy effect Photoshop
This is how the image looked before and looks after we applied the grainy film effect Photoshop. You can also do this on your own now using these steps.

Conclusion
Different effects show different types of photos. Different effects add different values to the photographs. Grainy effect Photoshop to add in a photo is not that difficult. It just hardly takes 5 minutes to do. Many famousphoto editing companiess also use this technique to add grainy effect in Photoshop to the photos. If you want to play with the effects then you must try doing this and change your photos like professionals.