Photoshop is such a tool designed for professional Photographers and photo editing service providers that they can easily change an image into something new. Image manipulation, Background removing, color adjustment, etc different sorts of effects can be applied to any image using Photoshop.
With help of Photoshop you can fix the skin of the model photos you have clicked that too by yourself. You can check out this Skin Retouching Photoshop Tutorial for further help.
You can use Photoshop to change photo background to white for ecommerce purpose. You can also learn the technique to edit 360 degree photos in Photoshop.
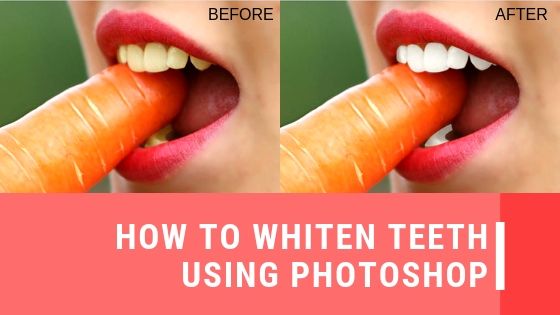
Nowadays everyone wants to hide all the imperfections from their model’s portrait photos like acnes, dark spots and black circles, etc. One of the main imperfections they want to hide is the color of the teeth. It looks odd or creates a bad impression of the Photographers work if the model’s teeth look yellowish. Photoshop can be very helpful in order to hide such flaws from the image.
We can do it by whiten the teeth using Photoshop image editing techniques. In this article we’ll show you the technique that can be used to hide such flaws and whiten the teeth of the model photograph.
For that reason without further waiting let’s start!
Open the Image in Photoshop
Photo editing is done best in Photoshop. Adobe Photoshop is considered as the powerhouse of photo editing. You can edit photos however you want by the help of Photoshop. But you have to know the uses of Photoshop.
The first use of Photoshop is you have to know how to open a Photo in Photoshop. There are not one but two ways of opening the photos in Photoshop. In the language of Photoshop, you can also say importing the photo in Photoshop. The first way of importing the photo into Photoshop is the manual way. In this way, go to File>Open. You will get a windows box. From the windows box, go to the drive you have your desired photo to edit. Click on the photo and click open. That will manually import the photo in Photoshop.
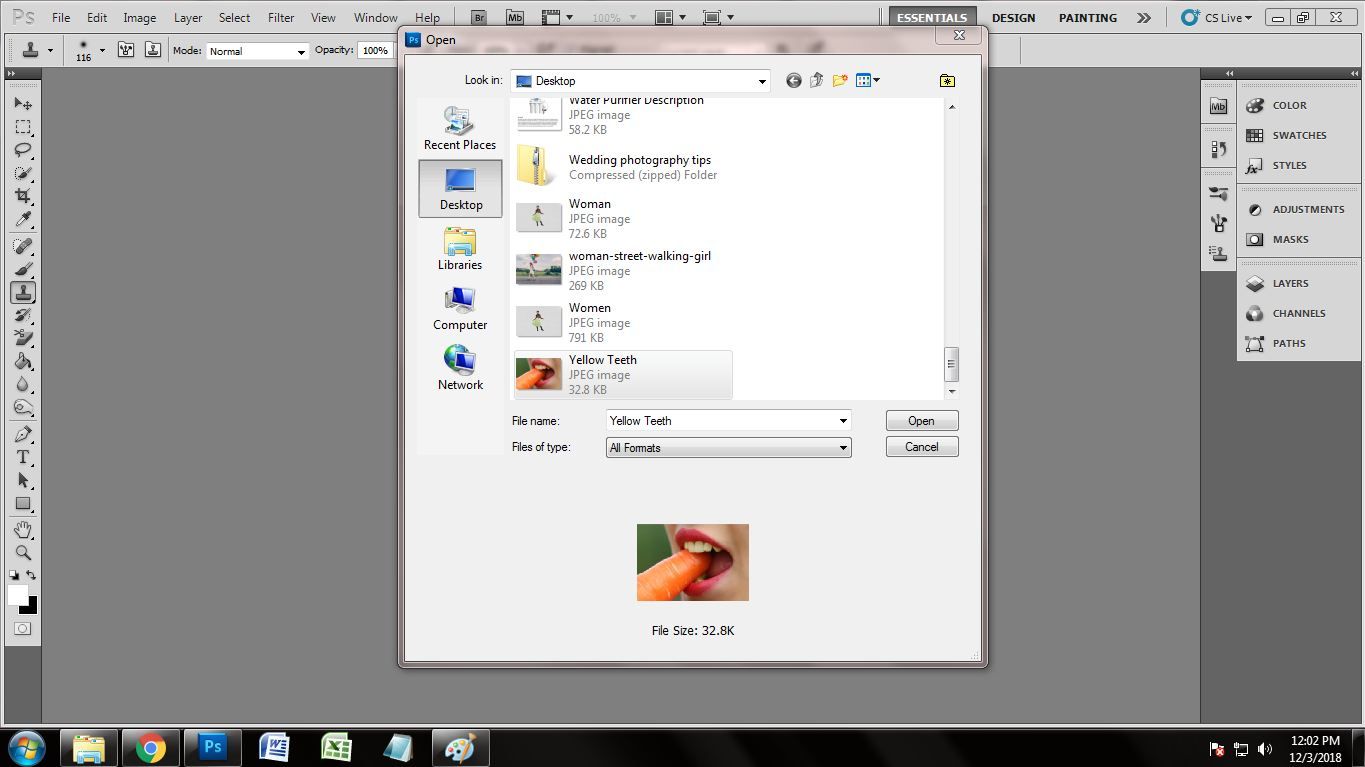
On the other hand, the easiest way of opening the photo in Photoshop is automatic way. You just have to drag the photo into Photoshop from the drive. Doing that, the photo will automatically be opened.>
Take Path Layer
After opening the image our next step will be to draw a path over the subject’s teeth. We will draw paths over it to whiten them using adjustment layer. Paths help us to select the area from the image we will need to edit.
In order to make a path we will need a path layer. Photoshop is all about layers. A path layer helps us to save the drawn path so that we can make a selection of the path anytime we want to. There is no need of drawing a path all the time.
To take a path layer go to the path tab. Then click on that small square box below the path tab. That will give you a new path layer. Now you can start drawing paths over it.

Select Pen Tool
The pen tool is the tool that helps us to draw paths around the area we want from the image using anchor points. It then selects the area and helps us to mask or cut out that part from the image.
To whiten teeth we will have to select the area of the teeth from the image. To make selection first we’ll have to draw paths over it using pen tool. To select the pen tool go to the toolbar then select the pen tool from the bar. The pen tool has an icon that looks like a pen. You can also activate the pen tool simply by just pressing the “P” button from the keyboard.
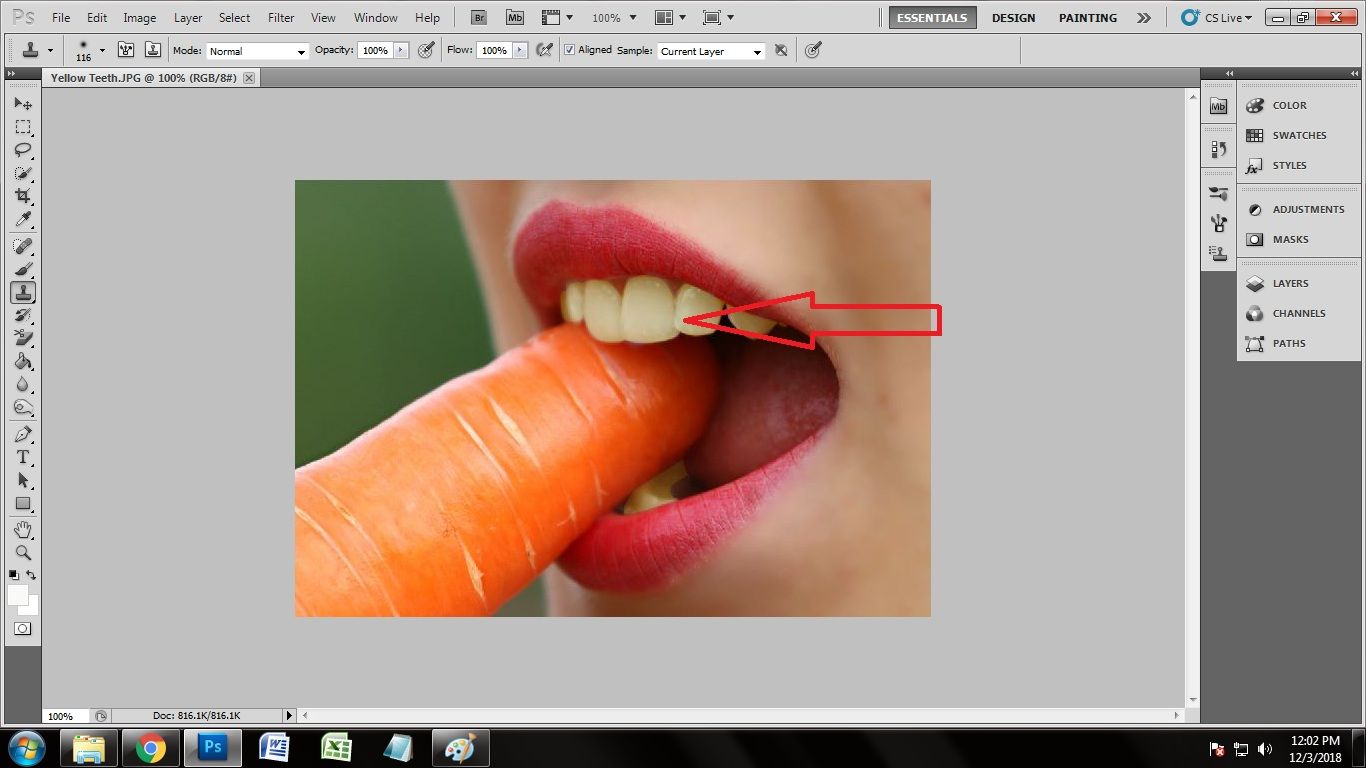
Now we can use the pen tool for drawing paths over the teeth.

Draw Clipping Path
After choosing the pen tool we will now have to start drawing the clipping path over the teeth. Drawing a clipping path will help us to clip or adjust the color of the teeth area only excluding the area without teeth. To draw a clipping path we will need to use our pen tool.
Click on the points of the teeth area using your mouse and create anchor points on the teeth area. It will be an outline of the teeth. After finishing the outline connect the anchor points to complete the process of clipping path.
Now we can make selection of the outline in order to whiten the color of the teeth.

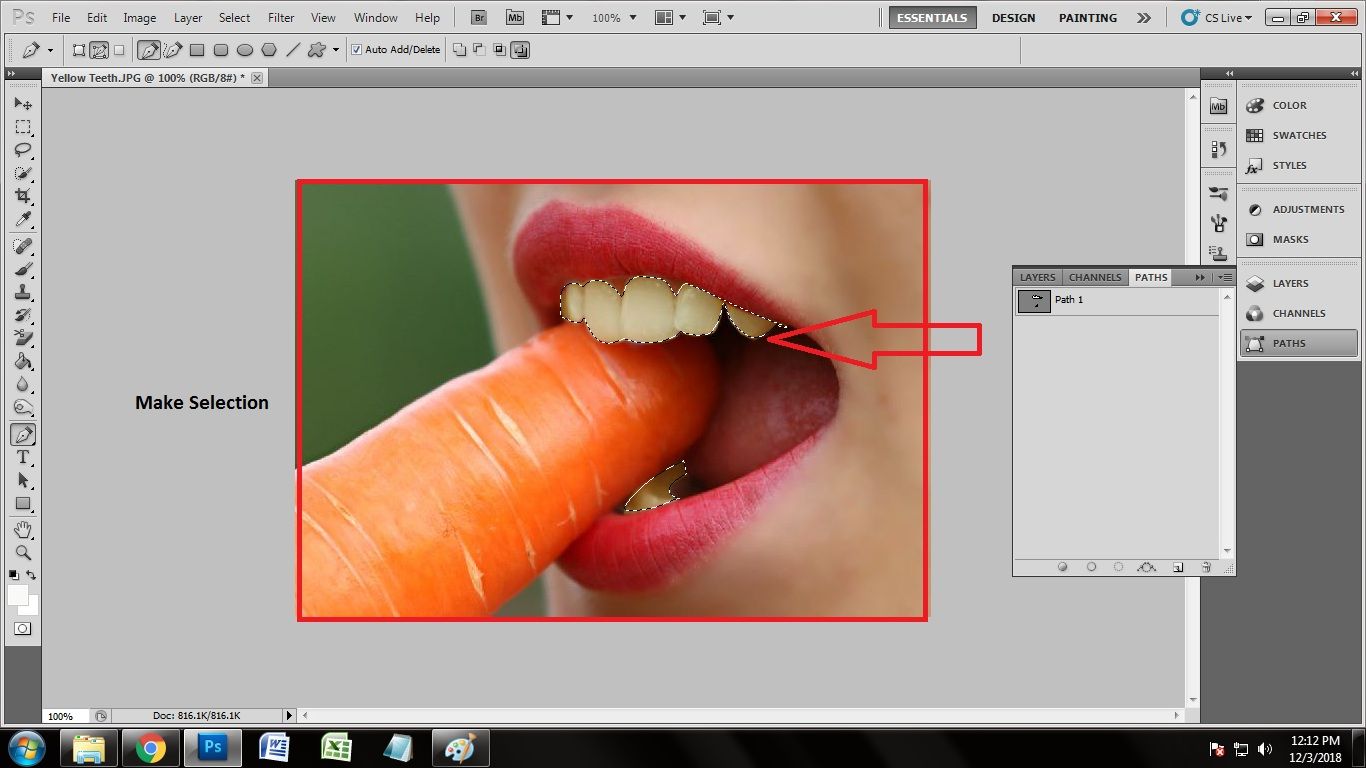
Make Selection
As we have just drawn clipping path over the teeth part of the photo, the next up we have to do is the selection. You cannot change or edit anything without making the selection of the path area. Since we are only showing teeth whitening technique, we are going to make the selection of only the teeth part. It is a very simple thing to do. We can make the selection only in few seconds.
To make the selection, keep selected the path layer. Press ‘Ctrl+Enter’ on the path layer to select the whole path layer Doing that, you will get to see many dots like ants are moving around the path area. That indicates that the path areas have been selected.
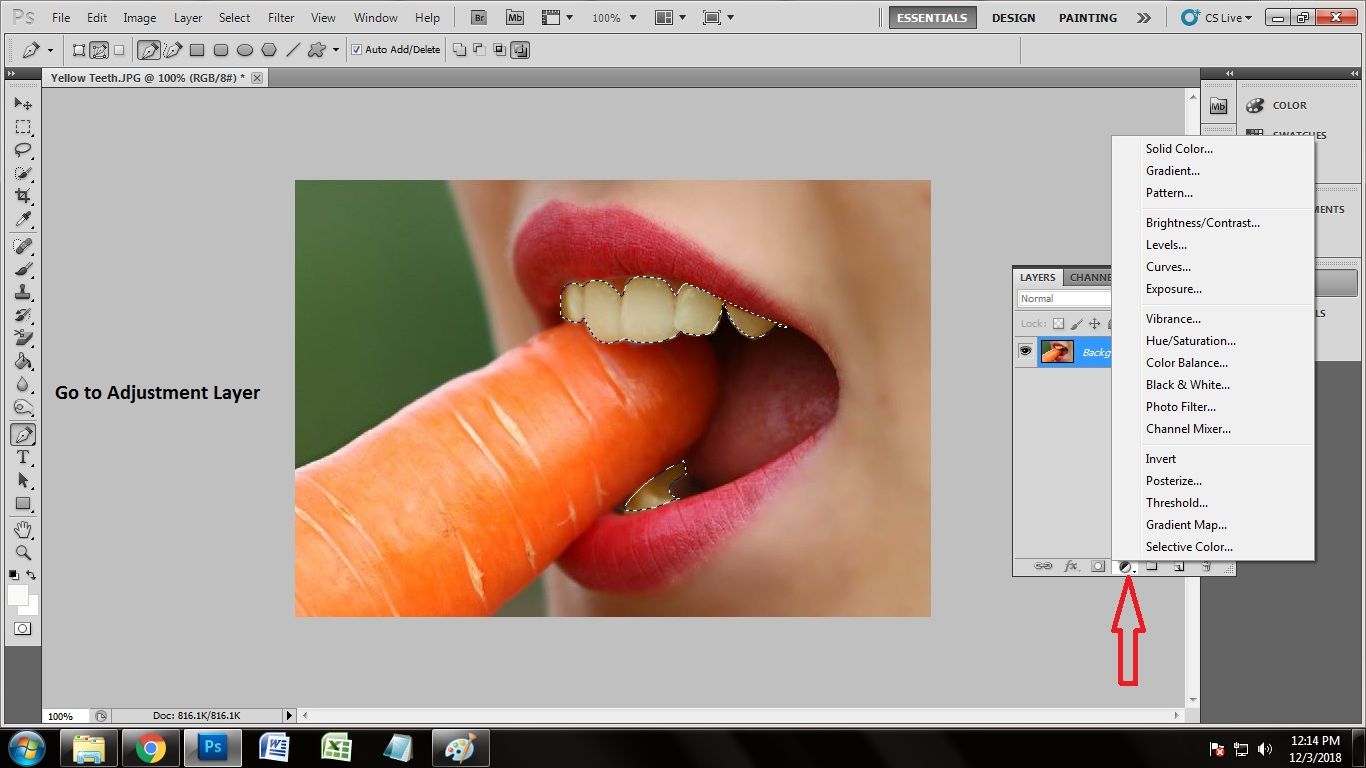
Go to Adjustment Layer
To whiten teeth in Photoshop, the best tool in the Photoshop is the adjustment layer. For every type of color adjustment thing, there is no comparison of adjustment layer. In adjustment layer, you can put every type of color adjustment on your photograph. So now we are going to go to the adjustment layer. Go to the Layer Panel and look at the bottom center of layer panel. The circular icon indicates that it’s the adjustment layer. Click on the icon and you will get a dialogue box.
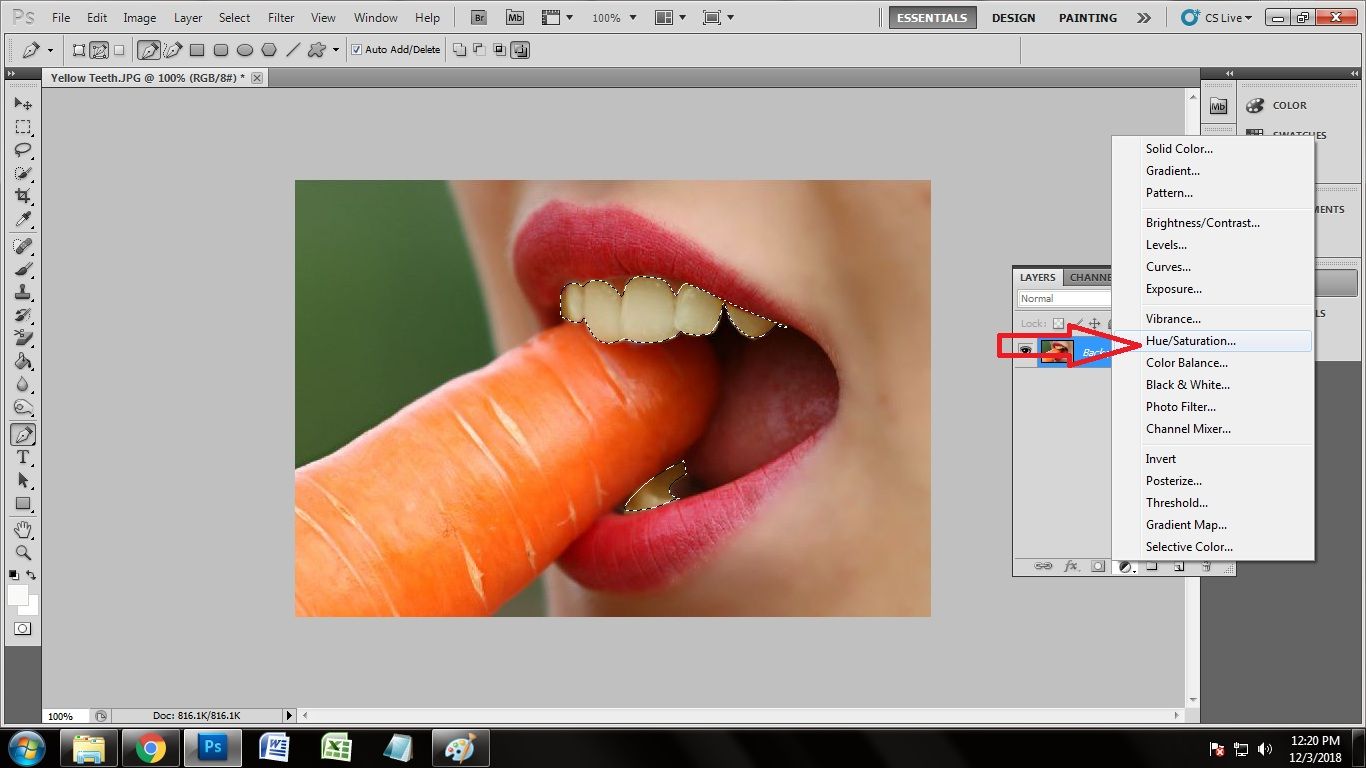
Select Hue and Saturation
Like we have already got to see the adjustment layer, we are going to choose one item from adjustment layer which can help us to make the teeth whiten. I was confused what to choose while selecting the item. Almost all the items can give you brighter teeth, but I had to go for the best one. So I went for Hue and Saturation tool. Hue and saturation tool can give you natural color. That made me to choose thatWhen you will click on the layer panel, in the dialogue box, you will get the hue and saturation tool. Click on the tool name to activate.
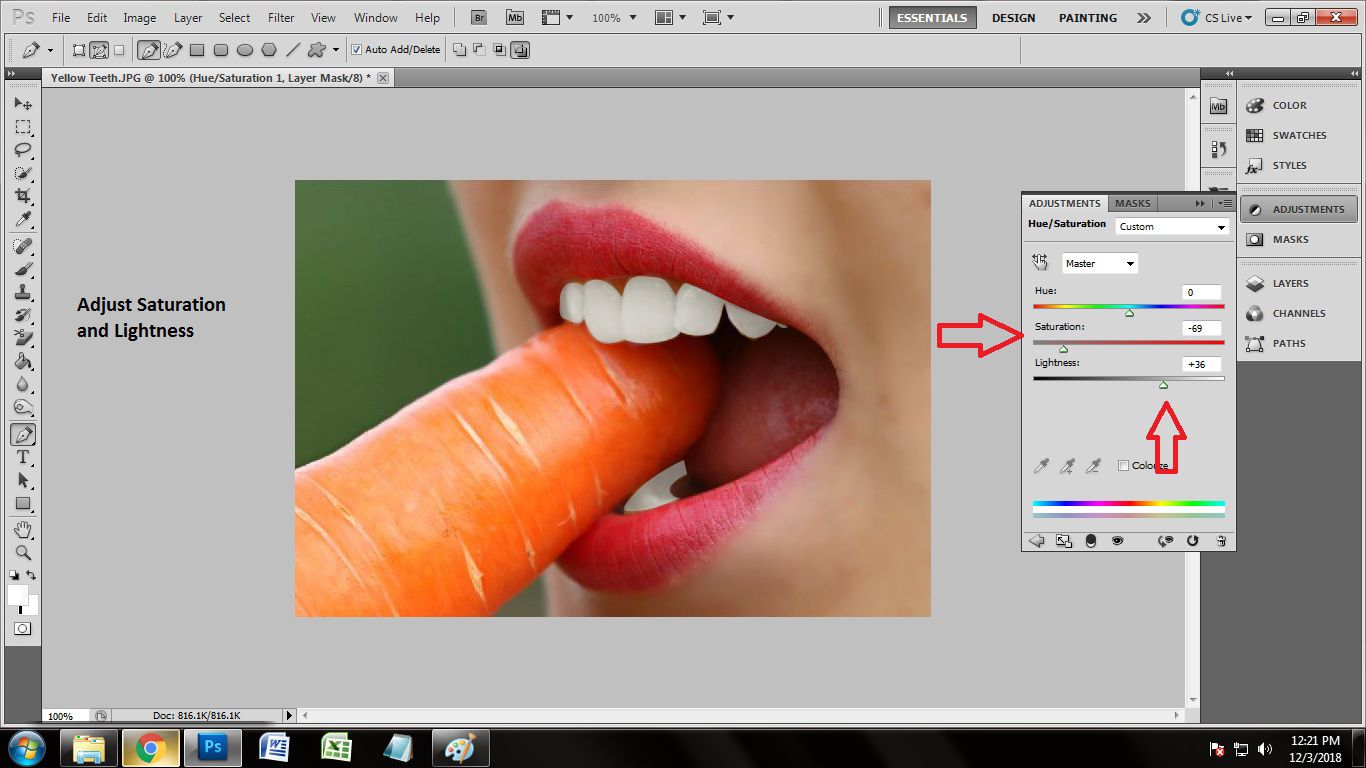
Adjust Saturation and Lightness
After clicking on Hue and Saturation, you will get another dialogue box consisting sliders of Hue, Saturation and Lightness. We are going to give a natural white color on the yellow teeth which is the reason we have decided to adjust the hue and saturation tool to adjust the color. Since we will be giving a natural whitening look to the teeth, we are just going to adjust the amount of saturation and lightness. Here we have used the slider and we have decreased the amount of saturation in -69 and raised the amount of Lightness to +36 which gave us natural whitening teeth Press Okay when it is completed.
Here’s the Condition After Adjusting Hue and Saturation

Conclusion
Photoshop is more or less a fortunate thing for all the Photographers, e-commerce businesses, graphic designers, Publications, etc. It has helped them to edit and render their images and has also helped them to grow their customer rate and conversion through it. It is a fact that images boost conversion rate.
Whitening teeth is also a part of photo editing technique. This technique helps us to hide the flaws from the teeth you can also use this technique to change color of any other object or parts of the body. Therefore, Photoshop can give us a lot of benefits while editing our images for Professional use.
References –
- How To Whiten And Brighten Teeth In Photoshop
- How to Whiten Teeth on Adobe Photoshop
- Three Ways to Whiten Teeth Using Photoshop